The management of locations within an inventory is crucial for the successful implementation of any chemical inventory system. This guide provides an overview of the purpose of locations within ChemInventory, and how they can be managed using the locations editing tool.
What are Locations?
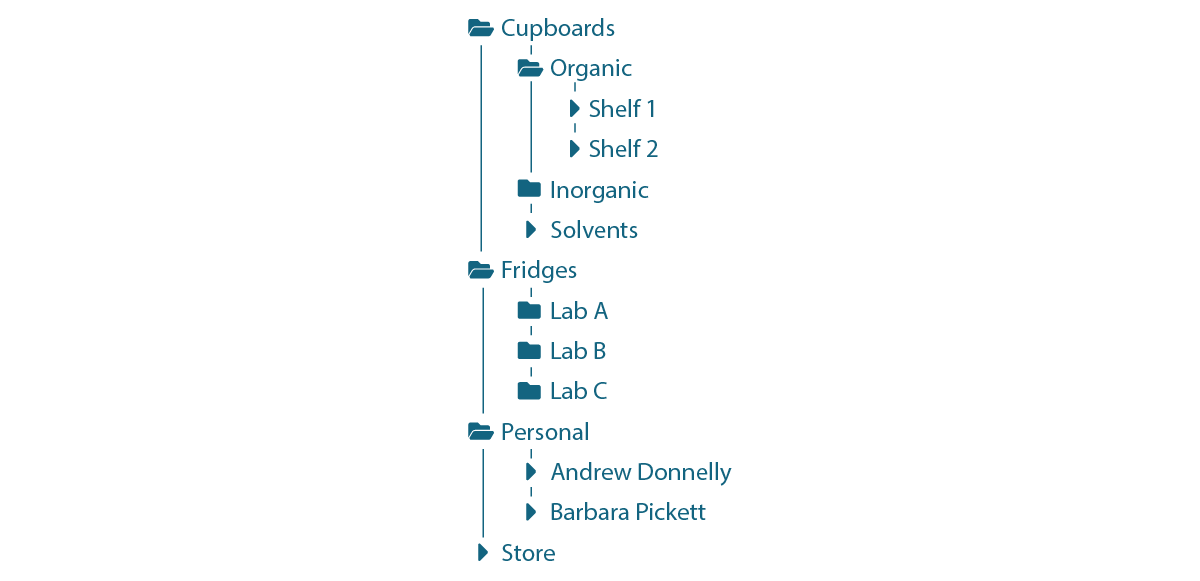
A location within your inventory is a place where container records can be grouped. It could represent a shelf within a laboratory cupboard, a place as large as a storage room or as small as a sample grid tray. Locations can be positioned in a hierarchy known as a locations tree, where parent folders hold child locations and folders in an organized structure.
With ChemInventory, you are free to create and manage your locations tree in whichever manner best suits your laboratory. There are no limits on the number of locations within your inventory, nor are there limits on the hierarchy depth within the tree. Locations can be given any name.
When searching for containers, locations are presented alongside results to enable users to quickly identify where they can find the relevant physical bottle. Any breaks within the location hierarchy in these listings are marked using the > character. For example, Lab 2.3 > Cupboard 1 > Shelf 4.
Location Barcoding
Locations can be assigned barcodes which enable users to move containers within your inventory quickly and with minimal effort using the scan to move tool . As for containers, these barcodes act as unique references for each location within your inventory and can be used to aid with auditing and regulatory compliance. The ChemInventory barcode generator can be used to create barcodes, if required.
Editing your Locations Tree
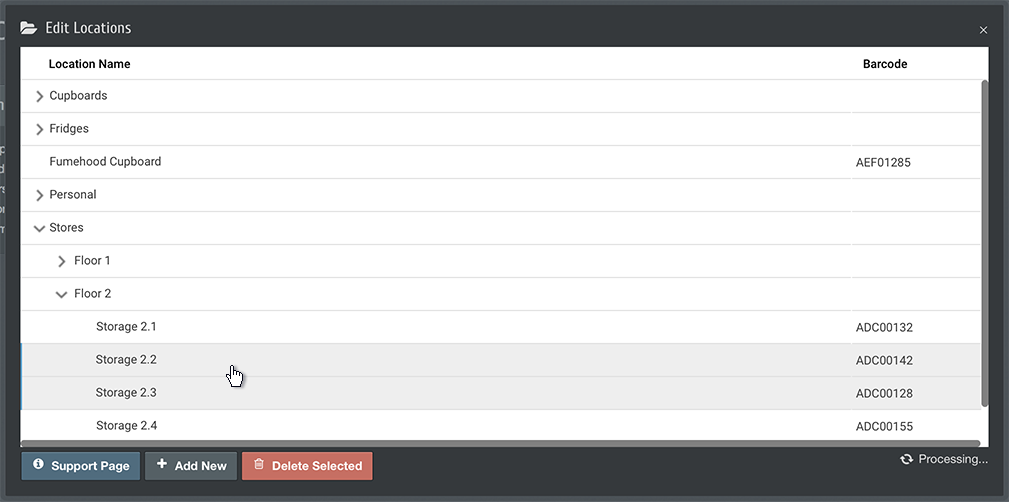
A dedicated tool is provided in ChemInventory to help manage your locations tree. Users with Group Administrator or Order Handler privileges are able to access this tool from the Locations page, by clicking on the Edit button.
The editing tool displays your locations hierarchy in a tree-grid interface. Any changes that you make to your tree are saved in real-time as they occur. Parent locations can be opened in the tree-grid interface by clicking on the enlarged > icon shown to the left of the location name.
Creating Locations
New locations can be created using the Add New button, shown under the tree-grid interface. When this button is clicked, a new location will be added to the top level of your location hierarchy. When you have finished typing its name click outside the editor or press the Enter/Return key on your keyboard.
Deleting Locations
To delete a location, first click on it in the tree-grid then click on the Delete Selected button. You can select more than one location at a time by holding the Shift or Ctrl (Command ⌘ on Mac) keys when clicking on locations.
Any container records saved within locations being deleted will be deleted also. We recommend that any containers are moved from affect locations before deletion. Similarly, when deleting a parent location all child locations and their containers will also be deleted.
Editing Location Information
The name or barcode of a location can be edited by double clicking on the value you wish to change. For example, double click on the name of a location to edit its name. When you are ready to save your changes, click outside the editor or press the Enter/Return key on your keyboard.
When editing the barcode of a location, ChemInventory will alert you if you have entered a value that is a duplicate of or clashes with another barcode within your inventory. You can choose to override the warning or undo any changes.
Moving Locations
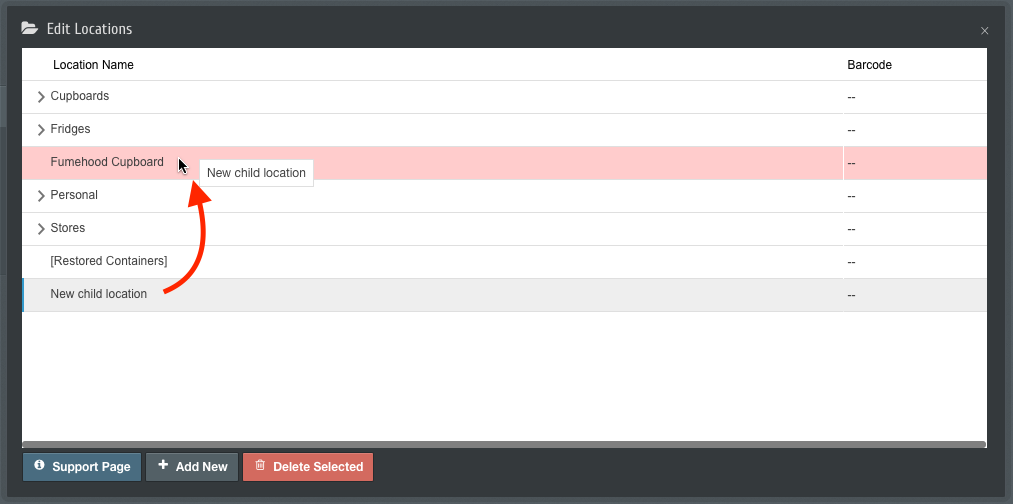
You can modify your locations hierarchy by first selecting the locations you want to move, then dragging them on top of another location. You can select more than one location at a time by holding the Shift or Ctrl (Command ⌘ on Mac) keys when clicking on locations.
The target location (where you drag your selection to) will be converted into a parent location and shown in your tree-grid interface using an enlarged > character. These locations will be shown with a folder icon () in other ChemInventory interfaces, such as the Move Container panel.
Parent locations cannot have any containers saved in them. When creating new parent folders by dragging-and-dropping, if the target location has containers saved within it then ChemInventory will display a warning and prevent the migration from occurring. You will need to move any containers in the target location elsewhere before it can be converted into a parent folder.